How To Make A Knitting Machine Needle Retainer Sponge Bar Part 3: Fuse Interfacing, Tape Ends, And Reinstall
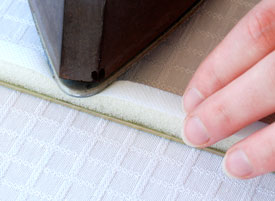 You are so close to being done.
Now that you have cleaned out the old gunk and glued in the new foam, it is time to attach the interfacing, tape the ends, and reinstall the bar into your knitting machine.
You will need a steam iron, woven fusible interfacing, ruler, pen, fabric scissors, and a small bit of packing tape. A rotary cutter and cutting mat are optional.
What To Buy
Fusible interfacing comes in a variety of fabric blends, thicknesses, and widths. I found woven worked the best. If you have some non woven at home, go ahead and try it out. I don’t think you will be disappointed.
If you need to buy, choose woven. For all the friction generated by the carriage moving the needles back and forth under the sponge bar, a woven variety should hold up better. I used both types of interfacing for this tutorial. Each adhered easily, and seemed to work identically. How it holds up long term is yet to be determined.
For woven, I bought 4 feet (122 cm) of Pellon Stacy Shape-Flex SF101. It is 20″ (50 cm) wide, 70% Polyester 30% cotton, and sold for $3.49 a yard. For non-woven, I got Pellon ShirTailor 950F. It is 22″ (56 cm) wide, 100% polyester, and cost $2.49 a yard.
Where To Buy
JoAnn’s on a 50% off sale. The woven set me back $2.32 for 4 feet (122 cm). The non-woven $1.65. Ridiculously cheap when you consider how many 3/8th inch (1 cm) strips you can get out of 20 inches (50 cm).
How To Finish
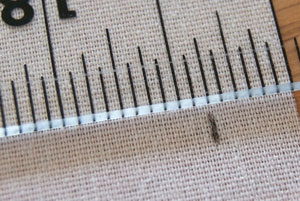 Measure a 3/8″ (1 cm) wide strip at least two inches longer than your foam.
To make my life easy, I buy 4 feet (122 cm) which is more than long enough for my lengthiest bulky machine. This gives me a little extra to hang over each end when I fuse it to the foam.
 Using fabric scissors or a rotary cutter, cut the interfacing.
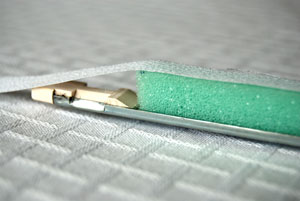 Lay the fabric on top of the foam with a bit sticking off each end.
 Following the directions for your fusible interfacing, turn on your iron to the specified heat and spot tack the material to the foam.
For my woven interfacing, I used the medium steam setting and held the iron in place for two to three seconds. I tacked the fabric every 6 to 8 inches (15 to 20 cm).
 After tacking, lay a moistened pressing cloth on top and iron the interfacing to the foam. My Pellon directions required 10 to 15 seconds per each overlapping section.
You do not have to press down hard. As long as the iron makes solid, gentle contact, you are good. If you remove your pressing cloth and find the interfacing is not stuck, simply go over that section a second time.
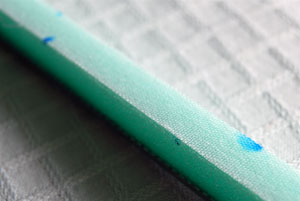 If you don’t glue the marked side of the foam to the bottom of the metal tray, this is what happens.
The steam iron causes the ink to bleed through the interfacing.
Not the end of the world. Just a tad ugly.
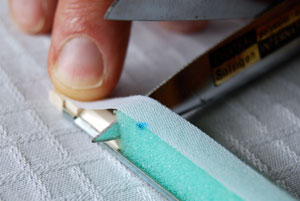 After the interfacing is all fused, trim off the excess from each end.
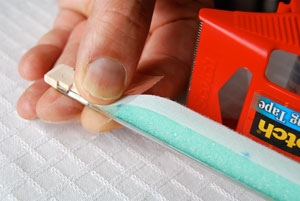 Cut off two pieces of strong packing tape, such as Scotch, and secure both ends.
You will want about a 1/2″ (1.3 cm) of the tape on the foam and the other 1/2″ (1.3 cm) on the metal.
 The tape should cling tightly all the way around the bar.
Your knitting machine needle retainer sponge bar is officially done.
To make sure everything is set and dry, I’ll wait 24 hours before installing the refurbished bar in my knitting machine.
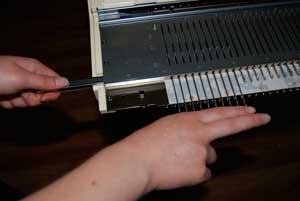 When you are confident your glue has dried, it’s time to reinsert the bar into your knitting machine.
Pick either side. While holding down the needles, slide the bar down its channel.
Share Your Thoughts
After making over a dozen sponge bars, I’m thoroughly pleased with how well they work, how inexpensive the materials are, and how easy it is to do, especially after getting over any nervousness of needing to cut foam or interfacing perfectly. Several of my attempts had gouges in the foam from an unsteady cutting hand. It made absolutely no difference in their performance.
If you make a bar, please share your results in the comments below, regardless of how far into the future you find this post. How has your bar held up? Did you use a different product that worked better for your situation? How long did it last? What did you use to clean out the old gunky glue?
Our machines benefit from everyone’s input.
Related Posts
- How To Make A Knitting Machine Needle Retainer Sponge Bar Part 1: Remove The Old And Clean For New
- How To Make A Knitting Machine Needle Retainer Sponge Bar Part 2: Cut and Glue Foam
- What Is A Knitting Machine Sponge Bar And Where Is It Located?
- InKnitters And Machine Knitters Source Magazine Are Dead
- Hat-a-thon, Beginnings, And A Simple Machine Knit Hat Pattern
July 26, 2008


110 comments
Very neat. I’ll try this when I replace sponge bars for my bulky and standard. With the Brother KX 350, there is, unfortunately, not metal strip to adhere the foam to. It’s just a piece of foam with ribbon on both sides. I could do the interfacing on both sides, like yours. It would have been nice if they had made the machine so that a metal strip guides the sponge through. Oh well.
Thanks again!
Mar
I think your idea to put interfacing on both sides is an excellent one. Hopefully the KX 350 can also use the 1/2″ (1 cm) foam. Other widths are hard to find and trimming the thicker foam is a pain.
On a side note, since this is your third comment you have received a link back. Thank you so much for taking the time to add to my site. Depending on your blogging platform, it may take a day or so for the link to show up in your user panel.
Kathryn
that was the BEST idea since sliced bread!!! KUDOS to you!!
I cannot believe that sponge bars have become so expen-
sive, so your solution is fantastic!! (I had also thought
that perhaps a length of felted fabric would work well
instead of the foam – any thoughts on that??)
Judi/Knox, IN
I have replaced the sponge in several bars using storm door stripping. It works O.K. but your method seems much more practical. Thank you for such a good explination. I also have a KX 350 and I do not think the purchased foam strips last long enough. I will try this next time with only the interfacing. Again Thank You.
Anne
Judi,
Your idea on using felt is intriguing.
The only hitch I could see is if the amount of felt needed to maintain the needles at the proper height prevented the bar from sliding in and out of its slot. The foam really squishes down when inserting or removing the bar.
Inside the machine, the sponge bar channel is deeper than its entry point at either side. The foam has room to gently expand.
Another thoroughly professional teaching job!
Thank you so much for giving of your time to help fellow machine knitters. I just finished stripping my DM8O following your instructions which (like these for the sponge bar) are clear and concise,
Well done!!
A note for KX350 users … when I had one of these machines – I would stitch one end of the new strip, to one of the ends of the old strip (using a couple of big granny stitches). So – when you pull the old one out – the new one followed in its wake and slipped easily into place, without having to take out any needles.
Thanks again – Terri
Having just paid out a considerable, though I consider perfectly reasonable for what was done, amount of money to have my 950i repaired I was somewhat frustrated to find that my Brother 260 was working less than efficiently, ie dropped stitches, ragged edges, mispatterning etc. I diagnosed that most of the problem was due to the fact that the sponge bars were about as thick as an ice cream wafer and just about as crisp. I was delighted, just by chance, to come across your article on making a replacement sponge bar, so I thought I would have a try, before spending more money than I could really afford just now. Apart from the foam, which was easily obtained from the local market, I had all the other items required and so I set to work and after a couple of hours I had a spanking new bouncy sponge bar. I have installed it into my machine and all appears to be working well at present. Only time will tell just how durable it is but thank you so much for your article. The instructions and diagrams were clear and easy to follow and I shall certainly pass on a copy of them to another knitting friend.
Terri and Marian,
I’m so glad you found my tutorials helpful. I try to pick topics that fix a problem I’m having and then share the results through lots of photographs.
Thanks for your detailed and useful tutorial. The photos are an excellent accompaniment to the written instructions. I appreciate the time involved in compiling this information.
If only I had had this guide before I purchased a number of sponge bars on eBAY! I still plan to make at least one, so I can compare it to the ready-made sponge bars.
Thanks again for your efforts.
BRILLIANT! thanks a lot x
Well.. I am a new knitting machine user, and I put a purchased sponge bar into my machine upside down, anyone have any clues as to how to get it out of there. I have the metal side down, sponge up, have taken all of the needles off and it’s just plain stuck in there!!!
I hope that someone can help me! It’s a brother palie machine
If no amount of gentle pulling/prying/coaxing/swearing works, your only remaining option is to take apart the machine. It is not hard, but the first time it is a bit scary.
I wish I had an easier answer.
Thank you thank you thank you. I have been wanting to try machine knitting and today picked up a cheap 2nd hand one in the Op shop for $10 – however after trying to knit and it jamming, I found out about sponge bars, found your site to DIY sponge bars, ran down to the hardware store and within an hour I had a beautiful pratice square made prefect!
Now I can play around with machine knitting and all up it cost me $10 for the machine and $5 for the parts to make the sponge bar 🙂
Your tutorial on refurbishing sponge bars is so excellent! I made my first one the other day and installed it yesterday. I was concerned that the 1/2″ foam would be WAY too thick as the old one that came out was flatter than the height of the sides of the bar. But it slid in with some coaxing and works great. We were out of the Goof Off, so hubby said to use lacquer thinner, and it worked perfectly. Thank you so much for taking the time to explain and show (love the pictures!) us how to do this. Awesome!
Pat,
I’m glad to hear that lacquer thinner works too. It is more widely available than the Goof Off.
OH MY!! I am so happy to have found this site. I have an EXTRA long bed Studio 700 with a sponge bar 58″ from end to end. I was beside myself with what to do. I am going to find the needed supplies and do this and thank you so much for the effort you put in to such great instructions!
Sincerely,
Lanette in MS
WOW! I’m impressed. Just found your site while looking for Passap information. (Someone gave me an older Passap with no instructions . Using your great info we were able to at least set it up! )
Then I noticed your sponge bar instructions. They are so clear and easy to follow, – and inexpensive. Will definitely try them next time I need one for my Brother machines.
Am looking forward to trying some of your patterns, too.
Thank you! Thank you!
THANK YOU!! I have recently purchased a few older used knitting machines. A couple came with new sponge bars but most did not and the idea of $25+ dollars to our local (1 1/2 hrs drive) dealer made me cringe. Tomorrow I will get out the stuff and go at it. Thanks again, great information well presented.
I was very pleased to see your clear instructions on replacing a sponge bar. I read somewhere on the internet last year about using self adhesive heavy duty draught excluder strips to make a sponge bar but couldn’t find any instructions. I went ahead and made one anyway, but actually took out the plastic strips either end which was very fiddly.
It worked but your idea is so much easier, and I shall try again with my Brother KH881 which definitely needs a new bar.
I can never understand why they are so expensive, but this solves the problem, and very cheaply. Thank you.
I loved your detailed instructions!
We have a wonderful MK club in Austin, Texas, and I’ll buy the foam and interfacing and make this a club demo. We can share the supplies. This will really help the ladies who have oddball sponge bars and can’t get replacements.
Thanks so much for all the work you put into this. It’s marvelous. Do you mind if we link to your site?
A link would be wonderful!
The more votes of confidence Google finds for my site, the higher I’ll rank for searches when other machine knitters are looking for information.
Thank you.
This is a real easy way of making a sponge bar. I have made them out of self adhesive draught excluder tape but they are only an emergency measure. Can’t wait to try this!
The iron on interfacibg is a brilliant idea…thank you so much, I will share your link with the ladies in our knitting club.
Enjoyed your tutorial.
I too, have redone sponge bars. I did find a weather seal foam 3/8 ” wide that worked perfectly. It had pull off tape with self adhesive which meant I didn’t have to glue.
I bought 3/8″ ribbon that I glued on with a latex glue. The water soluble glue is a great idea.
These are every bit as good as purchased ones in my opinion, and does save a lot of money, especially on shipping costs.
Joyce,
with 5 knitting machines, ribbers and 3 G-carriages. More is always better, right?
Must be why I have 5 kids, you think?
Thanks so much for your very helpful and informative tutorial. I just bought my first machine yesterday – an Empisal KH680L from 1975 in great condition. A lady in one of the Yahoo groups I belong to recommended that I check the sponge bar and sure enough – dead!
I have spent ages searching the net for new ones to no avail, so imagine how thrilled I was to find such fabulous instructions for making my own!
I plan on taking pics and blogging my progress with my machine so will send some in for you when I get a chance.
🙂 Gabrielle in Brisbane, Australia
PS – For those Aussie machine knitters – orange oil works a treat at getting the glue residue off (so I heard – yet to try it).
Gabrielle
thank you my mom really wanted one thank you
Thank you very much. I’m definately bookmarking these instructions!!
John L
I am anxiously awaiting the arrival of my first knitting machines (albeit used, but THREE of them!). Having done what I feel was considerable research on these, I knew that one of the first things I needed to check was the sponge bar. Last night I watched a video on replacing the spongebar using the weatherstripping, but today I found this site and have decided that your method seems much more practical!
Unfortunately, none of the machines I purchased have manuals, one is a Studio SK120, and the others are Juki – one a lace machine and the other a ribber. I really appreciated your tutorial on setting up the km’s and off to see what other goodies I can find here!
I found you through the ravelry machine knitters group. Thank you for these instructions! I refurbished my foam bar this weekend.
I used somet stuff in the garage to get the gunk out, it was called Engine Brite degreaser, worked fine. I also found a nice iron-on “mending tape” that was woven, it’s about an inch wide and worked great (instead of the woven interfacing).
After I put the bar in I was able to knit my first swatch on my very used knitting machine – a Brother 550. thanks!
Thank you so muh for the interesting tutorial and for the great photos.
Never again will I have to order a sponge bar from Hong Kong!
As I have eight machines and two of them need new sponge bars I am about to try this as I live in New Zealand some of the brand names will differant but I get the general idea. Will let you know.
Thank you so much for this. I am setting up my Singer Memo-matic after being packed away for about 25 years and I wasn’t sure what I would do about a new sponge bar. A very helpful knitter from Canada told me that I would need one. However trying to get one in New Zealand could be difficult. See there’s another Kiwi on here – hi Betty! Your photos and instructions are very clear and easy to follow. Once again, thank you so much.
Thanks so much, I’m cleaning an old 303 Studio with absolutely no wear marks on the carriage or needles, maybe one swatch worth, and the sponge bar is flat, but is about 4/5″ shorter than the newer model sponge bars. So guess where I’m headed….
Joan Smith
Thank you, thank you. I just made 3 and they work!
My question is… How do you clean the whole machine? Once I knew to remove the needles and clean them in “something”, but what?
Also the machine manufacturers say use nothing but Knitting Machine Oil. What is special about KMO?
I WANT TO SHOUT FROM THE HIGHEST MOUNTAIN
“THANK YOU, THANK YOU, THANK YOU!!!!!!!!!!!!
ALL THE WAY FROM SAN DIEGO.
I WANT TO SHOUT FROM THE HIGHEST MOUNTAIN
THANK YOU, THANK YOU, THANK YOU! ALL THE WAY FROM
SAN DIEGO……………………………………………………..
Great tutorial. I also have an Empisal knitting machine. I bought it new about 35 years ago, and used it while my kids were little then packed it away in a box for years and years.
I recently hauled it out and have set it up again … this time for the grandkids. I was able to purchase a replacement foam bar – though at a price of $25.00 I will be making my own in future. However, I need some replacement needles and can’t find a website that is offering them. Any suggestions?
For the moment I’m using the extreme outside ones to replace those in the centre, but obviously can only do that so many times before it becomes a problem. Anyone who knows of a source to buy them, I’d love to hear about it. Brother and other knitting machines are not transferable to the Empisal because of that little kink in the back (a bit like the NIKE swoosh) … other machine needles are completely straight.
My brother 836 works fine at the moment but I’ve just purchased a lace carriage which is bending a few needles and catching on every row – i presume it’s because my spongebar needs replacing?
How long did your spongebars hold up? I am keen to use this method rather than pay out for a new bar but not if it’s only going to last another 3 months. I use my machine everyday.
Thanks for a fab tutorial though – would really like to hear if it works!
Hi,
Thanks so much for your instructions…I have 5 bars that need refurbished.
I understand the foam is 3/8 inch wide but am unsure about the height is
it really an inch thick? Where could I purchase the foam?
I just received the email for your site and already have the goo begone on it.
Again,
Thanks,
Donna
Thank you, thank you. I have just repared four bars with two more to go. Wow, easy and such a great time/money saver!!!!!!! I taught machine knitting at Haliburton this past July and spent the first day reparing sponge bars with what I could find wich was weather stripping. Now I’ll take all this stuff with me as beginners always have machines from under someones bed or back of a closet that has a totally melted sponge bar!!!!
BTW I used a roll of Laundry Tape that I got for $3:99 for 12m (13 yards). Already the right width and iron on.
Love your blog.
I bought a Brother-knit machine a long time ago and struggled to get it working but never could. Just a few months ago I tried again by having my mechanical husband and father look at it with no luck.
Two weeks ago I found a Singer machine with ribber at the Goodwill and risked the $50 they were asking for it. I thought that this time I was going to do things right, so after some search I found a shop that had someone who would teach me how to set up and use the machine ($30 for 2 hours). They told me that I must change the felt bar first and made it sound like a very specialised and precise piece of machinery. They refused to even look at the Brother as it was too old a machine for them to bother with. After going through the set up for the Singer, I realised that the Brother may have a similar bar, so off to the internet I went and immediately found your site.
THANK YOU, THANK YOU, THANK YOU.
I will try it this afternoon and if it works, I can join knitters heaven with two working machines.
Have you tried ironing the interfacing to the foam before cutting? I have several needle bars to refurbish and ironing the interfacing prior to cutting would save a lot of time measuring and cutting.
I haven’t, but there is no reason why it shouldn’t work. Go for it!
I did it made my own sponge bar, will know tomorrow after it dries if it worked, I’m sure it will, Thanks for the info.
Many thanks for your instructions. I had been replacing the sponge with draught excluder but it doesn’t last very long. I have now refurbished two sponge bars – one main bed and one ribber on my Toyota 901. Brilliant. I found the foam and interfacing on eBay uk and bought a rotary blade in a local shop. Found the glue reduced in a stationers. After scraping off the old foam with a screwdriver I used Methylated Spirit to soak the residue and then it scraped off really easily.
Oh How many times might I say thank you!! How about a little haiku instead ~
lace carriage jams up
ancient sponge bar is to blame
Kathryn is genius
~
ok, so that was spur of the moment and sucked mightily, but hey, once again, THANKS!!! I just picked up 3 knitting machines (an old punch-card knitking kk98, a knitking compuknit IV, and a knitking compuknit bulky) at a garage sale for an unbelievable $50 for all 3, and brought them home and tried them out. They worked ok, but the lace carriage just jammed something snasty on the 4.5mm guage. That led me to an internet search and VOILA! there you were with your wisdom and the wonderfully good graces to share it!!
Unfortunately, I just spent $25 bucks for 2 new bars on eBay, but I am excited to replace these ones with homemade anyway, since I have one more to go, and besides which, I just hate the thought of shelling out $25 everytime the bar goes bad.
I do have a knitty question for you though, do you have any good ideas on homemade punch cards? I see that they are available on eBay, but again would prefer to make my own if possible.
Thank you for your time and talents!!
Sincerely,
Cara
Just thought I’d report back and let you know that indeed the sponge bars work VERY well!! I only had the green-ish foam available here, and I used a woven interfacing, which I attached all at once, so that when I rolled the left-overs up & put them away, that step is already done. Also, I found the foam cut more true with the interfacing already on ~ or maybe it just made it easier for me to see how I was cutting.
At any rate, the bars are installed, and what do you know ~ the lace carriage no longer jams up! In fact, the whole machine is knitting better! Once again, thank you so much ~ what an awesome post!!! Thank you for sharing your knowledge!!
Sincerely,
Cara (Red)
I just made one for a chunky knitter but cannot slide the bar back in. I bought 3/8 X 3/8 weather stipping and used the interfacing & taped the ends but it just will not go back in.
Hi Kathryn! Thank you for the lesson! Last night I bought 3/8″ carpet padding (10 lb. high density foam), made the sponge pad, and reinserted it this afternoon. I am having a problem. The needles are not lifting up at all. In fact. they are slipping up at the back of the grooves that hold them so you can see the end of the needle. I have a Singer 700. Would you suggest getting a thicker foam for this model????
Thank you so much.
I have a bulky knitter and knew that it was the sponge bar that was the problem. I did the sponge thing but it was the iron-on interfacing that had me beat, so to-morrow I will have another go at it. I’m so exited. Like most of you I have some lovely thick wools that I would like to make into garments. Thanks again from Aussie land