How To Sew An Invisible Vertical Flat Seam For Hand Or Machine Knits
As demonstrated in my Fairy Easy Passap Tuck Hat pattern, sometimes you need a flat, reversible join. This is particularly true for hats and socks.
When it’s time to seam, most patterns will tell you to mattress stitch which involves catching the horizontal threads on each side. That works well for sweaters where a sturdy seam is hidden on the inside. Not so good if your garment is reversible. When you turn up the brim of a hat, you don’t want to see a thick ridge.
This weaving technique, which some refer to as a Bickford Seam, works when both edge stitches are plain knit. You need matching sides of stockinette knots and loops. The seam is flat so regardless of which side is chosen, no ugly lump sticks out.
Step 1 – Knit Two Swatches
Hand
Knit two stockinette swatches with worsted weight yarn, measuring at least 2 by 4 inches. Use the same yarn and needles for both. You want the gauge to match, just as if they were two pieces of a sweater you were seaming. Consider blocking flat so you aren’t fighting the curl. This step is optional.
Machine
Rather than knitting two smaller swatches, it’s probably easier to knit one wide swatch and then seam as if it were the tube portion of a hat. The sample used in the photos below was knit on a Brother Bulky. E wrap cast on 40 stitches and knit about 50 rows with worsted weight yarn. For a standard gauge machine, cast on 80 stitches and knit 100 rows.
If you prefer working with two smaller, separate swatches
- Bulky – e wrap cast on 10 stitches and knit for about 30 rows
- Standard – e wrap cast on over 20 stitches and knit for about 60 rows
Step 2 – Find A Tapestry Needle and Yarn
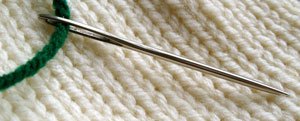 Use contrasting yarn of the same weight as the swatch while learning. It’s easier to see mistakes.
Use matching yarn towards the end to show off your skill and to see how invisible the seam really is.
Step 3 – Knot Knot Loop Loop
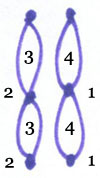 When you look at your stockinette swatches, the fabric edge climbs vertically in alternating loops and knots. To weave a Bickford Seam, your tapestry needle will travel:
| 1. Down through a knot on the right |
| 2. Up through the same row knot on the left |
| 3. Down through the loop just above the left knot |
| 4. Up through the same row loop on the right |
Repeat until all seamed. It doesn’t matter where you start in the sequence, as long as you continue in the same order.
Step 4 – Knot Knot Loop Loop with photos
To weave a reversible, flat, almost invisible Bickford seam, start at the bottom of your swatch and line up the two pieces to be seamed by putting the knot from the left piece of knitted fabric next to its corresponding knot on the right piece of fabric. Loops will automatically align if knots are aligned.
In this photo example, you will be seaming right knot to left knot, then left loop to right loop – essentially starting the weave at #2 in Step 3 above. Remember, where you start in the sequence doesn’t matter, as long as you follow the sequence.
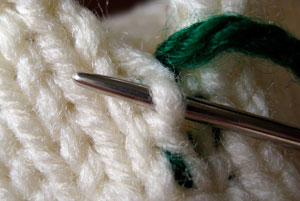 Thread a tapestry needle with yarn. Go up through a left edge knot.
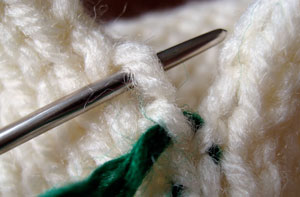 Down through a left edge loop
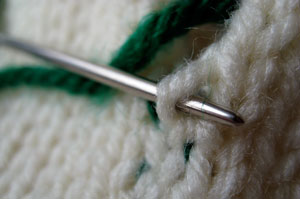 Up through a right edge loop
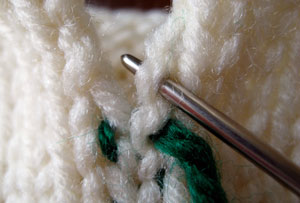 Down through a right edge knot.
Repeat these four steps until you reach the end.
This seam can still be seen, but it is the best one I’ve found when you want a truly reversible fabric.
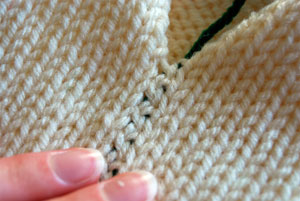 Knit side
Even with a dark green yarn for purposes of demonstration, the seaming thread is almost invisible.
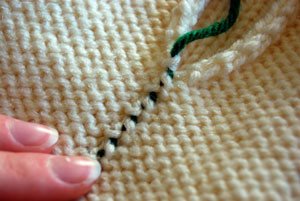 Purl side
Other Sites Demonstrating Bickford Seams
Dallas Fort Worth Machine Knitters Guild – Bickford Seams
Related Posts
February 17, 2009


13 comments
Thank you, thank you, thank you!!! I’ve never seen or heard of this method before, but I knit many socks on the KM. I think my seam is ugly, though it is flat. I can’t wait to try this Bickford seam!
Your pictures are wonderful. Thank you again for all your efforts and your willingness to share!
TJ
Amazing – thank for sharing this technique. I’d never heard of it before (seen on Lime and Violet’s Daily Chum)
Thank you. It is so hard to find information about machine knitting!!
Hi,
I need to know how to seam edges that have decreases at the beg and end of rows…the decreases that are done when the 1st and 2nd sts are knit tog. and when the last 2 st are knit tog.
If you could use illustrations I would greatly appreciated. I’m more of a visual person.
Thank you ,
Sly
You are a blessing for machine knitters! Thanks.
Many thanks. I have 7 panels of various cable to sew together into a recovery rug and was struggling to get it to look right. Now it does, thanks to your tip. Absolutely fabulous
This is very, very nice! I, too, MK socks and while I have a nice seam, practically invisible from the outside, it is slightly more visible on the inside and can be felt. I will use this method from now on. Thank you so much!
Thank you so much! This was much easier than it sounded!!
Great, can’t wait to try it out. thanks for sharing.
question#4: When you knit your decreases, make them two stitches in instead of on the edge. Then you have some live stitches to sew together with. I do this on everything regardless if seaming or not for a nice clean edge.
[…] taking away from the chevron effect (as a crochet or similar join might do)? I have investigated Bickford seams, but even they do not seem up to the job. Or, perhaps more truthfully, I am not sure I am up to the […]
Hi could you please let me know if you have a pattern for partial knitted cape with sleeves in
want instructions for partial knitting with sleeves