How To Make A Knitting Machine Needle Retainer Sponge Bar Part 2: Cut and Glue Foam
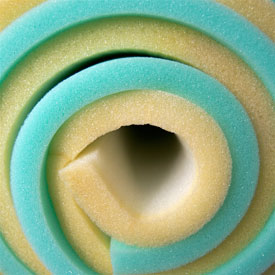 Now that your old retainer bar is squeaky clean, let’s replace the foam.
Some knitters like to use weatherstripping to refurbish their sponge bars. You can find directions on page 10 of this pdf from the Carolina Machine Knitters Guild and a video at Podcasting For Machine Knitters.
For a variety of reasons, this method didn’t work for me. Either the weatherstripping wasn’t available, gluing the woven ribbon made my bar too stiff and inflexible, or the materials were more expensive, averaging $2 per bar versus about 25 cents for my approach.
What To Buy
You are going to need water-based glue, sheet foam, ruler, razor blade or rotary cutter, cutting mat, and straight edge.
The glue is a no-brainer. Any cheap, water-based glue will work. I bought a 99 cent bottle of Aleene’s Tacky Glue. You want water-based so the next time you replace the foam, you won’t have to use Goof Off to dissolve industrial strength adhesives. Elmer’s school glue should also work.
The foam typically comes in two types and two thicknesses: high density-green or low density-beige, 1/2″ or 1/4″ (1.3 or .6cm). The latter is too thin so use the 1/2″ (1.3 cm). If in your area 3/8″ (1 cm) sheet foam is available, I would definitely try it as well. It wasn’t available where I live. Regardless of thickness, when you buy your foam, buy a length that will accommodate your longest sponge bar. For me that was my Brother Bulky machines. Four feet (122 cm) is plenty long enough with a bit extra to allow for mistakes.
Work Great In Many Different Machines
I tried my new bars in a variety of machines including Brother 840, 910, 950i, 965, 260, 270 as well as a Studio 150 and 155. The 1/2″ (1.3 cm) foam worked great in all my bulky machines and older punch card standard gauge.
The 950i worked well too, but it seemed like it took a bit more umph to move the carriage across the needle bed. Now granted, the sponge bar that came out of this machine was beyond dead and the carriage zipped across from lack of friction on the needles.
The difference was subtle. Without a new sponge bar to compare, I don’t know if the greater resistance was due to the machine wanting 3/8″ (1 cm) foam – which wasn’t available to buy – rather than 1/2″ (1.3 cm) or some other factor. My 965 was fine with the 1/2″ (1.3 cm) high density. If available, use the low density foam for Brother Electronic machines since it squishes easier. I’ll be checking back as the foam naturally squishes up inside to see if the 950 gets zippier.
Where To Buy Materials
In my neck of the woods, high density foam was easier to find. JoAnn’s, a nation-wide craft store, always had it in stock. Using one of its weekly 40% off coupons, 4 feet cost less than $6. At 2 feet wide (60 cm), even with many initial mistakes, I can get over 50 usable 3/8″ (1 cm) strips from the sheet.
Low density foam is cheaper and works a bit better due to it higher squishiness. However it was harder to find. I had to travel to an upholstery shop in another town to get it. It cost about $1 a foot for an 18″ (45 cm) wide sheet.
How To Make
 Lay the foam out and measure off a 3/8″ (1 cm) strip. You may need to even off the side first. The foam can sometimes be a bit wavy on the edge from the manufacturer.
Place as many tick marks as needed for you to cut a straight line.
 On my first few sponge bars, I used a razor blade and straight edge to cut the foam. It worked, but I found it was easy for the blade to waver back and forth.
My cuts weren’t very smooth. The foam still worked fine. I just knew it was a bit wonky hiding inside the machine.
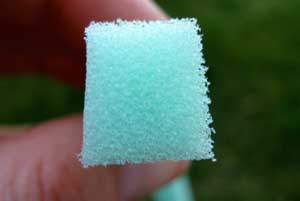 Here is one view of my less than square, trapezoid cuts.
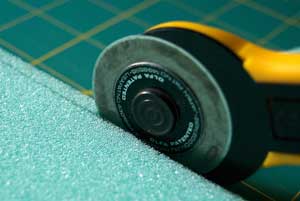 An Olfa rotary cutter works much better.
It decreased my frustration and improved my cuts immensely.
For those who have never used an Olfa before, be careful. This cutter is extremely sharp.
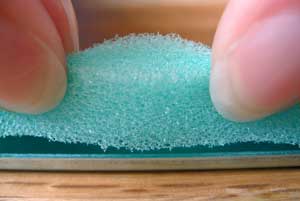 After the strip is cut, you can do a dry fit test run. If necessary, gently squeeze the sides…
 … and set in the metal tray.
Don’t stress if your cut isn’t perfectly straight.
It won’t be and it doesn’t matter. Close is more than good enough.
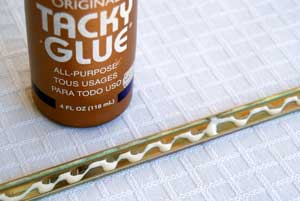 Set the foam aside and get out the glue. Swirl an even amount down the center of the tray.
Again, don’t stress about perfection. If you come up short, add more. If you bloop, wipe some out.
 Being careful of sharp edges, smooth the swirl out with your finger. The bottom of the tray should be evenly coated with a film of glue.
You don’t have to get glue up the sides or into every corner. A finger’s width down the center works great.
 For those of us who like things just so, take a look at your cut foam. One side will have ink on it, the other side will be clean.
To have the nicest looking sponge bar, place the inked side down into the glue. If you leave it up, it will bleed through the fusible interfacing when we attach it the next post.
Don’t be concerned that the foam is now off-white rather than green. The rest of the pictures are merely showing the low density foam rather than the high density. I made several bars at the same time and took a ton of pictures. I’ve picked the best to highlight each point.
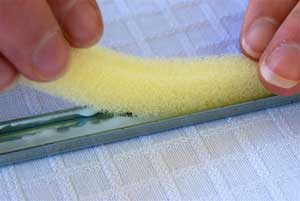 With the glue evenly spread, start at one end and lay the foam into the tray. Use one hand to hold the foam in place, will the other hand gently guides the foam into place.
You want the foam relaxed. Think Goldilocks and the Three Bears – not too squished and not too stretched.
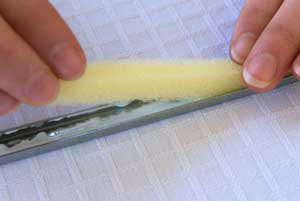 Here is an exaggerated view of foam being pulled as it is set in place.
DO NOT DO THIS!
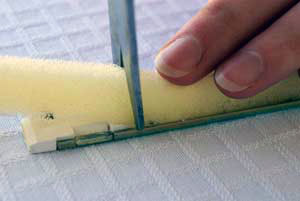 Only when you reach the end, snip off the excess.
If you cut to fit before gluing, you will either come up too short, meaning you compressed the foam together too much, or too long, meaning you stretched it out.
Always cut after gluing.
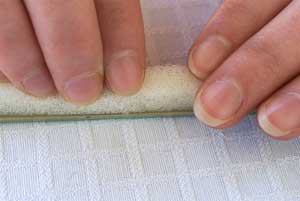 With the foam glued down, gently push to make sure everything is set in place.
Don’t compress the foam to the bottom of the metal tray. It may cause glue to be pushed up into the foam’s air pockets.
Also, check each side to make sure nothing has popped out of the tray. If a bit of foam has gone wayward, tuck it back into place.
You are done with Part 2. Set the bar aside and let it dry for a few hours. Next, we will cut and attach the fusible interfacing, tape down the ends of the bar, and reinstall into the knitting machine.
Related Posts
- How To Make A Knitting Machine Needle Retainer Sponge Bar Part 1: Remove The Old And Clean For New
- What Is A Knitting Machine Sponge Bar And Where Is It Located?
- How To Make A Knitting Machine Needle Retainer Sponge Bar Part 3: Fuse Interfacing, Tape Ends, And Reinstall
- How To Take Apart A Brother Punch Card Knitting Machine
- Make A Spinning Wheel Conrod Joint Out Of A 20 Cent Piece Of Vinyl Boat Cushion Cording
July 22, 2008


19 comments
Thank you, Thank you, I’m under the gun (and it is the Sat. afternoon) to get a project done and while the sponge bar worked fine yesterday it is not today. Flat as a pancake when I looked after spending 2 hours trying to figure out while the carriage wasn’t working.
I just want to confirm, you stated “use the low density foam for Brother Electronic machines since it squishes easier”, that you are suggesting to try the 1/4 inch foam for a Bother/Knit King 940? Thank you once again for this great tutorial. I’ll buy both and start the procedure then wait until I hear further.
Big Hug!
hello there! Does these instruction (making a sponge bar) work to LK 100 (singer)? And what is the size of the bar for this machine? (not the lenght, the width and the height-my sponge bar was destroyed when i bought the machine so i cant mesure it). thanks a lot!!!
I am not familiar with the LK 100. Hopefully another viewer can give you advice.
Thanks this looks fantastic and also a way to save some money!!!
It folks like you that keeps machine knitting alive.
I have an old knitting machine called a LOUISE thats all I know about it is there any way to find out how to use this is there a site that shows even SWEATER MACHINE THAT WALMART USED TO SELL ITS PLAIN AND MIGHT HELP I would love to learn how to use this one thanks
I have o;n old knitting machine called LOUISE I don’t know any thing on how to use it can you suggest how or where i can find info on how to use something this old. Its a very plain machine simular to the sweater machine walmart used to sell years ago
Hiya,
I have done up the wife knitting machine the “Brother 950i” i have followed many intructions your is the best!
The “Needle Bar ” have being refurbished up to the point of “fusible tape” and this has stumped me, as I do not know what it is!
Is it the tape you might iron on the bottom of trousers, when they become loose.
we went out first of all and purchased one at £16 95. then I found your web site easy up till now.
Is there such a product of a dvd or video you might help me on obtaining’
Thanks for your help so far!
Johnny
age 67
I have found that the Frost King rubber foam seal self stick tape works the best when making your own sponge bar. The one I used was 3/8 wide 5/16 thick and comes in a 10ft roll. When applying to your sponge bar or machine do not remove the tape covering the one sticky side this will be used like the ribbon that everyone else applies to the sponge. One side of this tape is sticky put the sticky side with no tape on it down on the sponge bar or machine and the side with the tape on it against the needles leave the tape on this takes the place of the ribbon or cloth and is very smooth for the needles to glide across. Replace your needles in one direction only and be careful not to tear this paper when reinstalling your needles. This paper must be smooth and without any bumps sometimes a repositioning will help to achieve this because it comes on a roll and straightening it out can cause the paper to get bumps in it. you may also apply a small amt of glue stick under the paper if you like. I have done this for my LK 100 and My empisol 281and it works just fine. This roll of weatherseal may be found at any Home Depot and comes in different widths and thicknesses. Give it a try .I think you will be amazed. You will definitely save yourself a lot time and money. Cost is between 2&3 dollars
Would it work to glue two 1/4″ strips together to make the desired thickness?
Installed my sponge bar tonight, selected some nice tofutsies sock yarn and did up a swatch. Holy cow I’m in love. Thank you for your tutorial!!
I am going to try this after the holidays. Thanks
Thanks for the suggestion. It sounds like a great idea. I googled high density foam and a link for 1/2″ weatherstripping at Home Depot came up. Do you think this might work? It’s grey, not green or beige.
I use a standard bed KnitKing 98 and a bulky 260.
thanks for your help!!
http://www.homedepot.com/webapp/wcs/stores/servlet/ProductDisplay?storeId=10051&productId=100166566&langId=-1&catalogId=10053&cm_sp=BazVoice-_-RLP-_-100166566-_-x&locStoreNum=6175
I tried to use the Frost King refrigerator seal and it compressed within a hundred passes of the carriage. I have ordered a new presser bar from the web and eagerly anticipate its arrival.
Hi, thank you for your help, I replaced sponge bar on KH150 model with weather stripping and glued ribbon on top. I used Goof off and it worked fine at Walmart, a lot less than ordering. However, NOW I am having a problem with my Singer bulky 120 bar. I bought 1/8″ weather stripping and put it in sidewarys with ribbone on top. However, it won’t go through opening for bar (crimped edges) Idon’t know if I should try to uncrimp the edge? Scotch tape or anying sticks out to much. Any advise please. I DID HEAR OF USING COTTON CORD or wrapping box cord, doubled over and over, did you ever hear of using heaving cotton cord?
Appreciate any help I can get.
Thanks a million.
Barbara
Hi, was wondering if anyone had a solution to making a sponge bar for a Studio SK121 -Bulky.
I think that the information on-line is great and have used it for another model.
My difficulty with the SK121 is:
-The bar is a folded piece of metal that is very narrow – approximately .5 cm high x 120 cm long, width is approx .5 cm.
I have tried cutting down foam, but because it is so narrow and I have no idea what thickness it should be, haven’t managed to work it out. My last attempt the foam would not stay attached when I slid the bar in.
Tried to get a new one, but couldn’t locate one.
Has anyone else found a solution for a sponge bar for this particular model?
Any suggestions would be very much appreciated. Thanks.
Lois
I just want to thank you soooooo much for this site that you have put so much work into. I originally priced a replacement needle retainer bar (wouldn’t sell me the foam separately) from a firm in Australia and they wanted $55. Being a pensioner I couldn’t afford this so I went onto eBay and ordered 2 foam strips (genuine Brother ones) for $14.00 in the UK. While waiting for these to arrive, I ‘discovered’ your fabulous site and set about making my own to your instructions which has ended up costing me only $11.00 for 15 complete replacement sponges. I managed to get the green foam which was 1.2cms thick and it works wonders in my 965i.
Can I just make a couple of comments on your article (I am not being nasty but it may make things easier for others) in the following paragraph, you have a small typo error which threw me at first (Maybe it should read 1/4″ or 6mm) sorry. The second thing was I found that I ironed my material onto the foam before I cut it, that way it saved me measuring and cutting twice.
The foam typically comes in two types and two thicknesses: high density-green or low density-beige, 1/2? or 1/4? (1.3 or .6cm). The latter is too thin so use the 1/2? (1.3 cm). If in your area 3/8? (1 cm) sheet foam is available, I would definitely try it as well. It wasn’t available where I live. Regardless of thickness, when you buy your foam, buy a length that will accommodate your longest sponge bar. For me that was my Brother Bulky machines. Four feet (122 cm) is plenty long enough with a bit extra to allow for mistakes.
I’m just waiting for my glue to dry. Thanks so much for this tutorial – I’m repairing the river on my knitmaster chunky. Really can’t wait to get going!
For uk knitters, I cleaned my bar with white spirit, which with a bit of elbow grease did a good job.
[…] 1. A replacement sponge – I bought a kit online which consisted of specially made sponge-bar sponge and some fusible fabric. Make sure you buy the right sponge for your machine, as widths vary between different brands. Other people have used weather-stripping, or cut their own sponge – if you’re feeling brave, you can find a tutorial for how to do this here […]
I’m trying to refurbish some old needle retaining bars for my wife’s Brother machines (several).
I’ve located a foam supplier here in UK but need more details on “high” or “low” density.
Does anyone have a better technical specification for the foam? Density? Compressibility? Thanks in advance