
Juan the Knitter rocks in TLC’s Ashley Paige Bikini or Bust
Thank goodness for Juan the Knitter. Finally fifteen minutes of fame for machine knitting.
The show, Ashley Paige Bikini or Bust, follows a high end Hollywood bikini knitwear designer throughout her day. To say she is a frazzled business woman would be generous. I wish her design approach and actual production process were highlighted. Instead, the viewer must agonizingly trudge through her dysfunctional life to catch glimpses of what makes her business work.
Continue reading…
July 29, 2008 1 Comment
How To Make A Knitting Machine Needle Retainer Sponge Bar Part 3: Fuse Interfacing, Tape Ends, And Reinstall
 You are so close to being done.
Now that you have cleaned out the old gunk and glued in the new foam, it is time to attach the interfacing, tape the ends, and reinstall the bar into your knitting machine.
You will need a steam iron, woven fusible interfacing, ruler, pen, fabric scissors, and a small bit of packing tape. A rotary cutter and cutting mat are optional.
July 26, 2008 110 Comments
How To Make A Knitting Machine Needle Retainer Sponge Bar Part 2: Cut and Glue Foam
 Now that your old retainer bar is squeaky clean, let’s replace the foam.
Some knitters like to use weatherstripping to refurbish their sponge bars. You can find directions on page 10 of this pdf from the Carolina Machine Knitters Guild and a video at Podcasting For Machine Knitters.
For a variety of reasons, this method didn’t work for me. Either the weatherstripping wasn’t available, gluing the woven ribbon made my bar too stiff and inflexible, or the materials were more expensive, averaging $2 per bar versus about 25 cents for my approach.
July 22, 2008 19 Comments
How To Make A Knitting Machine Needle Retainer Sponge Bar Part 1: Remove The Old And Clean For New
Knitting machine sponge bars are not cheap.
By the time you add in taxes or shipping, they can easily cost over $25. Multiple this by a few machines plus matching ribbers, add in the fact you should change your bars every few years, and it quickly becomes cost efficient to put up with a bad one. You cross your fingers and hope the beast works well enough. It usually won’t.
I needed a simple, inexpensive solution that would be as identical as possible to the original sponge bar.
Continue reading…
July 18, 2008 36 Comments
What Is A Knitting Machine Sponge Bar And Where Is It Located?
Flat bed knitting machines use a sponge bar to hold the needles in place as the carriage moves back and forth. It is about 3/8″ wide and runs the whole length of the bed. Sometimes this bar is referred to as the needle retaining bar. Many ribbers also require one, although some use a bar without any foam, such as in the Brother KR850 standard gauge ribber.
When the sponge bar goes bad, so will your knitting. Stitches may drop for no reason or the carriage might jam, getting its underside caught on needles at the wrong height. When my machines act up, the sponge bar is the first place I look.
Your needles can tell you how your sponge bar is doing. Depending on the machine, the needles will react differently when the bar starts to disintegrate.
 When the foam is dead in a standard gauge machine, there is nothing to hold the needles down. They will pop up in their channels which can cause the carriage to jam and needles to bend.
When the foam is dead in a bulky machine, the needles become loose and sloppy. They don’t pop up like a standard gauge machine.
July 14, 2008 21 Comments
Free Stitch Design Software For Hand and Machine Knitting – WinCrea
Win_Crea is a wonderful Windows freeware program for the Passap E6000 knitting machine. It is very similar to Stitch Painter and the Stitch Designer module in Designaknit. With some limitations, this software gem can be used by all machine knitters and hand knitters.
It is a very simple program to learn. In less than an hour, I was able to combine two clip art images, change a few colors, and add some columns to make the blanket image below. No, I do not have lots of experience with the software. This design was my maiden voyage. If you have used any basic bit-mapped graphics program, you will quickly grasp Win_Crea’s tools and menus.
![]()
July 8, 2008 20 Comments
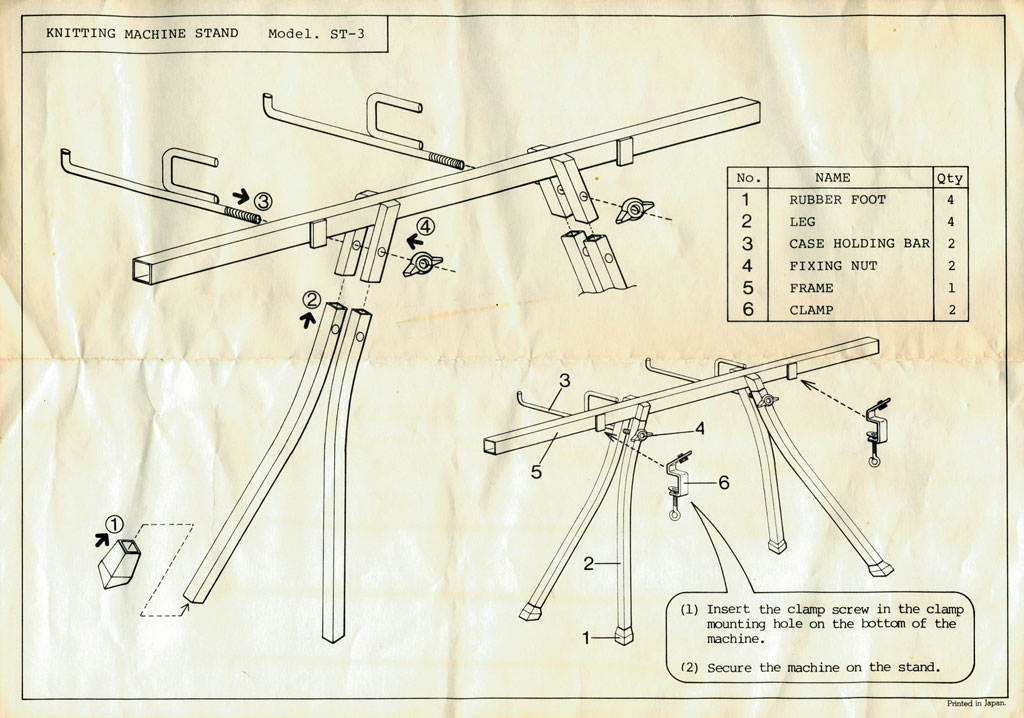
How To Assemble A Knitting Machine Tilt Stand – Brother, Studio, Singer, Silver Reed
There are two types of Japanese knitting machine stands, tilting and non tilting. Being able to adjust the stand is helpful when a ribber is attached. If you want to knit flat, you can shift the main bed down and forward for a more user friendly angle without removing the ribber.
Clarisse has uploaded a scan of the tilting stand instruction sheet. Assembling the non tilting stand model ST-3 is almost identical. I’ve uploaded its instruction sheet here.
I’ve always attached my machines to large tables so I don’t have a lot of practical experience with these types of stands. If anyone has any tips on how best to use a Japanese stand, please leave a comment below. I’m especially interested if anyone has put additional support under the back of the knitting machine. It seems like a lot a weight to be hanging by two c clamps.
Let’s begin.
 1. Lay out all the pieces. You should have four legs, a main cross bar with two securing L arms to adjust the tilt, and two case holding bar assemblies with wing nuts and nuts.
As you’ll see towards the end, there is also a safety stopper.
June 30, 2008 25 Comments
Thank you Linda
In the 1990’s, Linda ran a successful knitting machine shop. As the craft slowed down, so did her business. After shutting her doors, she held on to some of her inventory, hauling it across the country and back several times. This past weekend, she was ready for the equipment, yarn, and books to find new homes.
We were very fortunate to be one of those homes.
In the coming year, we’ll be able to post several how-to photo tutorials on Designaknit cables, linker, mid gauge ribber, and the electronic bulky machine because of her generosity.
Up first is How To Assemble A Knitting Machine Tilt Stand – Brother, Studio, Singer, Silver Reed.
Linda, thank you so much. Your equipment will be well loved.
June 23, 2008 2 Comments


